Multiple Camera SetUp For Recipe Video Recording
Multiple camera setup for recipe video recording at home. We use one camera for close up and other for distance shots. Using 2 camera is easy and fast.

Most of us and I am talking about home based food recipe sharing brigade, start and use a single camera for shooting. Isn’t it?
As we are also in the same boat, I thought of sharing the camera set up that we use. We currently use a 2 camera set up to make the video recording of the whole recipe event smooth and faster.
The shooting with 1 camera is also possible but is a bit hectic on the following grounds:
- You have to record the video in serial flow. Camera angles and location has to be reset for each shot that would focus first focus on ingredients and close of recipe and other times to the face of the actor.
- It is possible to just focus on actor initially when he/she is talking and then completely on the recipe ingredients and the process. But, this would make the whole video monotonous. Here is an example of this type of 1 camera shoot that we used to do earlier.
- If you have a camera man, like I was the one for my wife Maahi’s videos, you still have a better chances of utilizing the single camera for covering face as well as the recipe preparation. But, mind it that it will be full of camera jerks, hiccups, shaky and image stabilizing issues.
- Recording takes more time as you need to change camera angles as and when you want to talk about the recipe focusing on the actor.
The set up of a 1 camera is fairly simple if you use a tripod. You can only use 1 angle and focus only on 1 thing at a time i.e. either the recipe or the recipe maker.
Using 2 Camera Set Up For Recipe Video Recording
As you may have guessed by now, 2 camera set up is done to expedite the whole recipe making process and record the whole recipe making process in one go. We do not need any stopping and re-arranging the cameras.
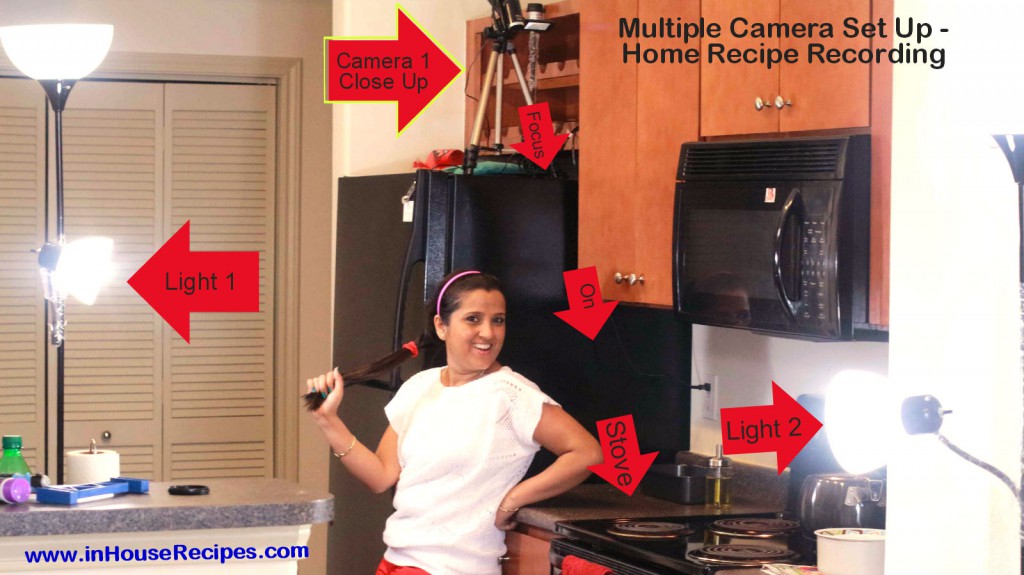
Camera 1 – We call it the close up camera. It is used to focus entirely on the recipe ingredients and the recipe process continuously.
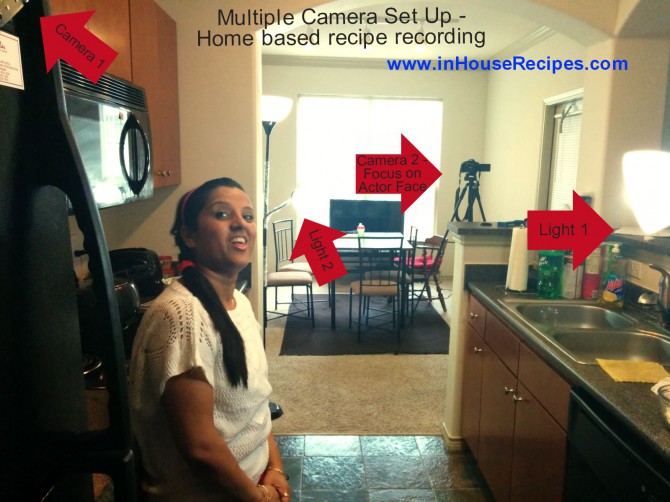
Camera 2 – We name this the FACE camera. We use it to focus on the actor i.e. Maahi, the recipe maker.
-
Camera Placement
- Camera 1
is carefully placed over the top of the slab or the stove to have a direct, aerial and close focus on ingredients as well as the pan that we use in the recipe. The other aim that we want to have here is close-up of stove AND skip the eye of Camera 2. - If you use a tripod to create the height, the tripod would be visible in the Camera 2. To get rid of this issue, we place the Camera 1 tripod on top of refrigerator. This works for our needs as the refrigerator is an object which can easily be shown in the camera 2 without any issue.
If it was Camera 1’s tripod instead of refrigerator, it would have looked odd.
- Camera 2‘s
responsibility is to capture the distance (about 5-6 feet) shots. Hence, we keep it away and at a distance which can capture the whole/part of kitchen area.Generally, the stove in the home made recipe videos is placed next to a wall as opposed to center placed stove in professional recipe videos.
Home based set-up makes it difficult to capture the distance shoot in the sense that the camera 2 cannot be placed right in front of actor. It has to be placed on left, right or back of the actor. The back is an odd place but sometimes, it is the only option in the Kitchen with 1 side opening.
- Back side Of Actor:
We have used this camera placement earlier but stopped using now.You have to be clever in this case while editing the videos. Whenever the actor is showing his back in this camera 2, your video focus should be on camera 1. Showing the back of the actor is not recommended.
Sometimes, you may have to keep showing the Camera 1 clips for extended time just because camera 2 captured the back of the actor. This is avoidable if you use the left or right placements.
- Left Or Right Of Actor:
This is a better placement than the ‘back’ one. We have now started using the right side of Actor for camera 2 placement. It makes it easy to edit and merge the camera 1 and camera 2 clips without worrying about the back of the actor. - Front Of Actor:This is the best possible placement for Camera 2. If you have the option of modifying your kitchen to bring the stove to the center somehow, please go for it. It will make your life a lot easier with recipe video recordings.
- Back side Of Actor:
- Camera 1
-
Tripod
Yes, we use 2 separate tripods to station the cameras. This is helpful in avoiding the shaky recording. Tripods also help us record without the extra assistance of a camera man.
The 2 tripod we use have different maximum stretchable height as per the requirement.
- Camera 1’s
height is determined by its location. Since, we use it to for close up of food items and place it on another object preferably greater than the height of the actor, we can easily use a smaller height tripod as well.The one we use has the maximum height of 50″ Inch (4 feet, 2 Inch) but only stretch it to 2 feet.We install this camera on top of the refrigerator.
- Camera 2’s
height is quite important due to its focus on the actor. The height of the tripod would be determined by the height of the actor here.Since Maahi is 5 feet long and mine is about 5 feet 8 Inch, we chose a tripod with maximum height of 72 Inches.
The idea is to have the camera reach a height which can match the actor’s eye level.
If you place the camera lower or higher than the eye level, the final recording would look odd and skewed.
Also, some people just try to tilt the angle of the camera to mitigate the lower or higher height of the tripod. This is not advisable again due to the tilted and skewed view.
- Camera 1’s
-
Audio
Although, the audio is recorded in both the cameras, the one we use in final video is the camera 1’s audio. The reason is the close proximity of this camera with the speaker. The close the actor/speaker to the camera microphone, the better the clarity of voice would be.
You can also use a Sony WCS999 wireless microphone system if the distance between the actor and the camera microphone is deteriorating the quality of audio. We have not felt the need as yet and hence do not use it.
-
2-Camera Video Combining And Editing
I don’t know of a free video editing product that can allow you to combine more than 1 clips at a time.
I tried searching a lot when we started but could not find a one which can provide quality that we were looking for. So, we finally settled for the Sony Movie Studio Platinum Suite 12
. This allows up to increase the number of camera’s in future as well. The home version of Sony Movie Studio is a bit on the cost side (approx. 70 USD) and is worth as well as sufficient for home based recipe video recordings.
There are multiple professional level and expensive software available in the market but I do not think they are required for YouTube and your home based set up.
The Windows LIVE movie maker (or Windows LIVE movie maker) that comes free with windows installation is only capable of editing one camera recording. You won’t be able to use it for 2 camera recording.
This article is only about the 2 Camera set up and hence I have not talked about editing the 2 video recording with a video editing software. I will probably cover this topic in a separate article.

